Easy Peasy Lamp Shade {How To}

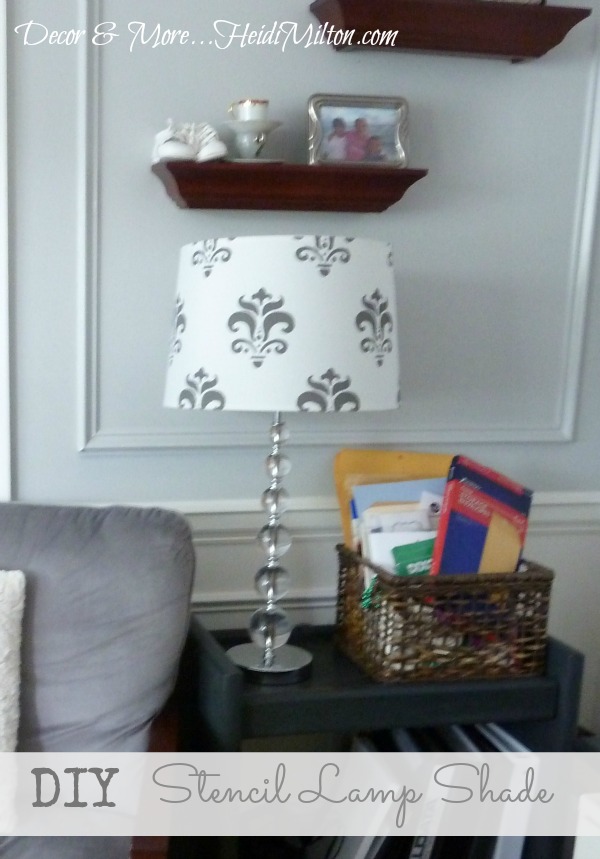
I am loving my new lamp and lamp shade combo in my Mom Cave…er, home office. 🙂  I know I have to share the space with the other four peeps in my household, but it’s slowly evolving into more “mine” than “theirs.”  Thoughts?

Anyhoo, the lamp shade I revealed over the weekend was a super easy project that makes a big impact when you walk into the space.

Start to finish, I spent about 50 minutes on this.  And maybe $5 tops.  The lamp and shade I purchased with a Target gift card I’d received for my birthday.  The craft paint and sponge brushes I already had.  The stencils came from the WalMart craft section (a favorite haunt of mine) and cost under $5 for the package.

I decided on the large damask stencil and gray craft paint.
I started on the back of the lampshade where the seam is.  I figured if I was feeling my way with this, better to goof on the side that would be facing the wall anyway!  I wanted to see a full damask pattern in the center of the lampshade all the way around and parts of the damask on the top and bottom.  So the full one came first.  I totally eyeballed the middle of the shade (my scientific method you know), used two simple pieces of masking tape to hold the stencil and got started!
Notice I left the edges of the tape loose so peeling them up and removing the stencil was a clean and easy motion.  I used the paint sparingly, brushing lightly to fill in the blanks.  If it looked too light or I could see the fabric through the paint, I went back and dabbed lightly.  This stencil has lots of curly q’s, so I had to brush in different directions very gently for even coverage and clean lines.  I also wiped the stencil off with a wet rag periodically (especially the back side) to ensure no extra paint went awry.
By the time I had worked my way around the entire lampshade, the paint was dry enough to start on the bottom layer.  Again, I just eyeballed placement of the stencil so pattern would look even (or close to it!).  Notice I added a piece of tape at the top to help further secure the stencil. The painting here was a little trickier since the edge of the lamp shade was involved, but again, slow and steady was the key.
You can see how I ended on the back seam of the lamp shade again.  The lines are not as precise due to the seam here, but again, this side will face the wall. 🙂
Once I had the bottom row done, placement of the top row was easy peasy.  I simply lined them up.  This time I started on the seam and began working my way around.  Slow and easy.  Looking good!
And here is the finished product!  The gray and white look super crisp against my purple walls and I adore the damask pattern.
Love, love, love!
So, there you are — what do you think?  Easy peasy way to jazz up an inexpensive lamp shade!  Loving the bang for the buck on this project.
Linking up in these fabulous places:
The Mustard Ceiling

Happy Stencilling!

Comments

  1. Cassie @ Primitive & Proper says

    that looks fabulous! lovely lampshade makeover!

  2. Alison@Oopsey Daisy says

    I LOVE that stencil!! Gorgeous, Heidi! 🙂 Have a great day!!

  3. Tiffany @ {Living Savvy} says

    I love this idea! Great work!

    Tiffany {Living Savvy}
    savvydesignwest.com

  4. Cassie {Hi Sugarplum!} says

    That looks so good, Heidi! I've yet to try a stencil…but it's on my to-do list!

  5. Found you on The Mustard Ceiling. Linked you to my blogroll at imagesouthfineart.com.

    Barry

  6. Lisa - A Room with A View says

    Great work. I love stenciling but have not done a shade yet! Visiting via The Mustard Ceiling.

  7. That's a great idea! I'll definitely be trying this, because I can never find lampshades that I like.

  8. Lovely idea! Thanks for the tutorial!

    Jessie
    http://www.mixandchic.com

  9. elizabeth@themustardceiling says

    Such a cute idea to add a little something special to your lampshade.

    Thanks for linking up to my mix and mingle party this week!

    I see your bloggy bootcamp button. When are you going? I'm going to the one in Denver in September.

  10. The Vintique Object says

    You did an amazing job spacing the stencil! It looks professionally done.
    Camille

  11. Jena @ Involving Color says

    Heidi, your lampshade turned out great! The gray stenciling looks really nice with everything else in the room. I've been thinking of trying something similar on a couple of my lamps, and this is inspiring me to give it a try!

  12. Ms. Bright says

    Hi there! Great tutorial and our shade turned out great! I'm visiting from The Mustard Ceiling's link party!

    xo

Trackbacks

  1. […] For a tutorial on the stenciled lamp shade, click HERE. […]

Speak Your Mind

*